465.100
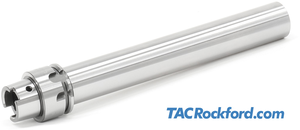
HSK Spindle Runout Test Arbors
For DIN 69893 / ISO 12164 Spindles
TAC Rockford's HSK Spindle Runout Test Arbors are the essential high-precision instrument for verifying the accuracy of your machine tool spindles. This critical gauge provides a fast, reliable, and definitive way to diagnose alignment and runout issues that directly impact part quality and tool life.
- Ultra-High Precision: Typically guaranteed radial runout of 0.003mm (3 microns / 0.0001") or better, ensuring the highest level of diagnostic accuracy.
- Manufactured from premium, hardened alloy steel and precision ground for stability and longevity.
- Each arbor is supplied with an individual Certificate.
- Contact us for other lengths, tapers, and other special requirements.
- Carrying cases are not included. Available case options listed below.
| Taper | Length (L) | Diameter (D) | Standard | Part Number | ||||
|---|---|---|---|---|---|---|---|---|
| HSK-A/C/E 25 | 140 mm | 20 mm | DIN 69893 / ISO 12164 / ASME B5.62 | 465.125.000.000 | ||||
| HSK-A/C/E 32 + B/D/F 40 | 180 mm | 24 mm | DIN 69893 / ISO 12164 / ASME B5.62 | 465.132.000.000 | ||||
| HSK-A/C/E 40 + B/D/F 50 | 180 mm | 24 mm | DIN 69893 / ISO 12164 / ASME B5.62 | 465.140.000.000 | ||||
| HSK-A/C/E 50 + B/D/F 63 | 346 mm | 32 mm | DIN 69893 / ISO 12164 / ASME B5.62 | 465.150.000.000 | ||||
| HSK-A/C/E 63 + B/D/F 80 | 346 mm | 40 mm | DIN 69893 / ISO 12164 / ASME B5.62 | 465.163.000.000 | ||||
| HSK-A/C/E 80 | 346 mm | 40 mm | DIN 69893 / ISO 12164 / ASME B5.62 | 465.180.000.000 | ||||
| HSK-A/C 100 | 349 mm | 40 mm | DIN 69893 / ISO 12164 / ASME B5.62 | 465.190.000.000 | ||||
| HSK-A/C 100 | 500 mm | 50 mm | DIN 69893 / ISO 12164 / ASME B5.62 | 465.190.050.500 | ||||
| HSK-A 125 | 349 mm | 40 mm | DIN 69893 / ISO 12164 / ASME B5.62 | 465.192.000.000 | ||||
| HSK-A 160 | 400 mm | 40 mm | DIN 69893 / ISO 12164 / ASME B5.62 | 465.196.000.000 | ||||
| HSK-B 80 | 345 mm | 50 mm | DIN 69893 / ISO 12164 / ASME B5.62 | 465.280.000.000 | ||||
| HSK-F 63 | 346 mm | 40 mm | DIN 69893 / ISO 12164 / ASME B5.62 | 465.663.000.000 | ||||
| HSK-F 63 Short | 150 mm | 40 mm | DIN 69893 / ISO 12164 / ASME B5.62 | 465.663.040.150 | ||||
| HSK-F 63 | 250 mm | 40 mm | DIN 69893 / ISO 12164 / ASME B5.62 | 465.663.040.250 | ||||
| HSK-F 80 | 346 mm | 50 mm | Makino Flange-Pin Spindles | 465.680.000.000 | ||||
| Custom | Contact us with your requirements | 465.100.SP |
Carrying Cases for HSK Runout Arbors
TAC Rockford runout arbor cases are specifically designed to protect your precision spindle runout test arbors. These cases feature high-density, custom-cut foam interiors that secure the arbors. They ensure your critical measurement tools are shielded from dirt, damage, and impact, maintaining their accuracy and readiness for preventative maintenance.
| Runout Arbor Type / Size | For use with runout arbor(s) | Case Style | Part Number | |||||
|---|---|---|---|---|---|---|---|---|
| HSK-A/C/E 25 | 465.125.000.000 | Compact | 499.212.113192 | |||||
| HSK-A/C/E 25 | 465.125.000.000 | Heavy Duty Travel / Pelican | 499.210.113484 | |||||
| HSK-A/C/E 32 + B/D/F 40 | 465.132.000.000 | Compact | 499.212.113246 | |||||
| HSK-A/C/E 32 | 465.132.000.000 | Heavy Duty Travel / Pelican | 499.210.113483 | |||||
| HSK-A/C/E 40 + B/D/F 50 | 465.140.000.000 | Compact | 499.212.113030 | |||||
| HSK-A/C/E 40 | 465.140.000.000 | Heavy Duty Travel / Pelican | 499.210.113481 | |||||
| HSK-A/C/E 50 + B/D/F 63 | 465.150.000.000 | Compact | 499.212.113026 | |||||
| HSK-A/C/E 50 | 465.150.000.000 | Heavy Duty Travel / Pelican | 499.210.113482 | |||||
| HSK-A/F 63 | 465.163.040.150 and 465.663.040.150 | Compact | 499.212.112983 | |||||
| HSK-A/F 63 | 465.163.040.150 and 465.663.040.150 | Heavy Duty Travel / Pelican | 499.210.113503 | |||||
| HSK-F 63 L=250 | 465.663.040.250 | Compact | 499.212.113247 | |||||
| HSK-F 63 | 465.663.040.250 | Heavy Duty Travel / Pelican | 499.210.113502 | |||||
| HSK-A/C/E 63 L=346 | 465.163.000.000 and 465.663.000.000 | Aluminum Horizontal | 499.215.113077 | |||||
| HSK-A/C/E/F 63 | 465.163.000.000 and 465.663.000.000 | Heavy Duty Travel / Pelican | 499.210.113175 | |||||
| HSK-A/C/E 80 | 465.180.000.000 | Aluminum Horizontal | 499.215.113067 | |||||
| HSK-A/C 100 L=349 | 465.190.000.000 | Aluminum Horizontal | 499.215.113066 | |||||
| HSK-A/C 100 | 465.190.000.000 | Heavy Duty Travel / Pelican | 499.210.113122 | |||||
| HSK-A/C 100 L=500 | 465.190.050.500 | Aluminum Horizontal | 499.215.113095 | |||||
| HSK-B/F 80 | 465.280.000.000 and 465.680.000.000 | Aluminum Horizontal | 499.215.113070 |
Indicators and Bases
TAC Rockford offers a variety of magnetic bases and indicators for use with runout test arbors and other gauges.
Available as kits with storage case or individually.
Excessive spindle runout and axial play are the leading causes of part finish issues, tool breakage, and tolerance control problems. Regular use of an HSK Test Arbor is critical for proactive maintenance and damage control:
Post-Crash Verification: Immediately check the spindle's alignment and condition after any machine collision.
New Machine Setup: Ensure proper installation and initial spindle calibration upon delivery or relocation.
Preventative Maintenance: Perform periodic checks to detect bearing wear and alignment issues before they lead to costly scrap parts and machine downtime.
Maximize Tool Life: Eliminate a major source of premature tool wear and cutter breakage.
Improve Part Quality: Achieve tighter tolerances and superior surface finishes by verifying a true-running spindle.
Reduce Downtime: Quickly verify the machine's health, avoiding lengthy repairs and unexpected outages.
Ensure Consistency: Maintain a stable and repeatable production environment, especially when moving jobs between machines.
Spindle Runout Test Arbor Instructions
One of the leading causes of tool breakage, part finish issues, tolerance control, and machine registration issues is excessive spindle runout.
For more information regarding this item (HSK Spindle Runout Test Arbors) or other items, fill out the form below
or contact our office directly:
Telephone: 815-962-5600
Fax: 815-962-4600
Location: 304 North Main St, Suite 104, Rockford, IL 61101-1101 USA
Email: infο@ΤΑCRοckfοrd.cοm
Related
HSK Standard Ball-End Runout Test Arbors
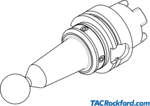
Ball end spindle runout test arbors are designed checking positioning accuracy of 5-axis machines, but can also be used in place of a standard runout test bars when a shorter length is required or for a touchoff point from the spindle face (ball end is ideal for this purpose).
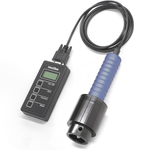
HSK Drawbar Force Gauge Sensors, Wired
Wired Forcecheck sensors also require a wired display unit and connecting cable to fully function.
HSK Precision Ball-End Runout Test Arbors
Our 467 precision version feature an adjustment mechanism which allows for improved accuracy when compared to our standard 466 ball arbors.
HSK Tool Changer Alignment Gauges
Available for HSK-A 25, 32, 40, 50, 63, 80, 100, 125, and 160. Includes padded storage case.
HSK Tool Holder Taper Inspection Gauge
Designed to detect tool holder taper wear in seconds.
The tool holder taper inspection gauge includes two Fixture Bases, two 0.001mm Indicators, and a carrying case. An optional 410.148 certified Taper Master is strongly recommended for zeroing the Indicators. If a master is not available, a known good tool holder can be used in place of the master.
<b>Additional product information can be found on the Details tab below.</b>
Carrying Cases for HSK Runout Arbors
TAC Rockford runout arbor cases are specifically designed to protect your precision spindle runout test arbors. These cases feature high-density, custom-cut foam interiors that secure the arbors. They ensure your critical measurement tools are shielded from dirt, damage, and impact, maintaining their accuracy and readiness for preventative maintenance.
Indicators and Bases
TAC Rockford offers a variety of magnetic bases and indicators for use with runout test arbors and other gauges.
Available as kits with storage case or individually.


