467.100
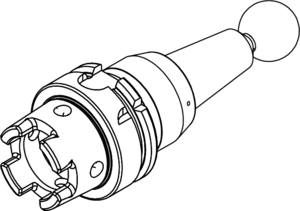
HSK Precision Ball-End Runout Test Arbors
For verification of 5-axis HSK taper spindle machining centers
Our 467 precision version feature an adjustment mechanism which allows for improved accuracy when compared to our standard 466 ball arbors.
![]() PDF Data Sheet: HSK Precision Ball-End Runout Test Arbors (467.100)
PDF Data Sheet: HSK Precision Ball-End Runout Test Arbors (467.100)
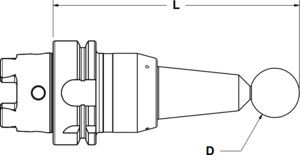
| Taper | Length (L) | Ball Dia. (D) | Runout | Standard | Part Number | |||
|---|---|---|---|---|---|---|---|---|
| HSK-A/C/E 32 + B/D/F 40 | 150 mm | 30 mm | <0.005 mm | DIN69893/ISO12164/ASME B5.62 | 467.132.000.000 | |||
| HSK-A/C/E 40 + B/D/F 50 | 150 mm | 30 mm | <0.005 mm | DIN69893/ISO12164/ASME B5.62 | 467.140.000.000 | |||
| HSK-A/C/E 50 + B/D | 150 mm | 30 mm | <0.005 mm | DIN69893/ISO12164/ASME B5.62 | 467.150.000.000 | |||
| HSK-A/C/E 63 + B/D/F 80 | 150 mm | 30 mm | <0.005 mm | DIN69893/ISO12164/ASME B5.62 | 467.163.000.000 | |||
| HSK-A/C 80 | 150 mm | 30 mm | <0.005 mm | DIN69893/ISO12164/ASME B5.62 | 467.180.000.000 | |||
| HSK-A/C 100 | 150 mm | 30 mm | <0.005 mm | DIN69893/ISO12164/ASME B5.62 | 467.190.000.000 | |||
| HSK-A 125 | 150 mm | 30 mm | <0.005 mm | DIN69893/ISO12164/ASME B5.62 | 467.192.000.000 | |||
| HSK-F 63 | 150 mm | 30 mm | <0.005 mm | DIN69893/ISO12164/ASME B5.62 | 467.663.000.000 | |||
| HSK-F 80 | 150 mm | 30 mm | <0.005 mm | Makino HSK Flange-Pin Spindles | 467.680.000.000 | |||
| Custom | Contact us | 467.100.SP |
Carrying Cases for HSK Precision Ball End Runout Arbors
TAC Rockford runout arbor cases are specifically designed to protect your precision spindle runout test arbors. These cases feature high-density, custom-cut foam interiors that secure the arbors. They ensure your critical measurement tools are shielded from dirt, damage, and impact, maintaining their accuracy and readiness for preventative maintenance.
| Runout Arbor Type / Size | For use with runout arbor(s) | Case Style | Part Number | |||||
|---|---|---|---|---|---|---|---|---|
| HSK-A/C/E 32 + B/D/F 40 | 467.132.000.000 | Compact | 499.212.113317 | |||||
| HSK-A/C/E 40 + B/D/F 50 | 467.140.000.000 | Compact | 499.212.113318 | |||||
| HSK-A/C/E 50 | 467.150.000.000 | Compact | 499.212.113319 | |||||
| HSK-A/C/E 63 | 467.163.000.000 | Compact | 499.212.113057 | |||||
| HSK-A/C/E 63 L=200 | 467.163.030.200 | Aluminum Horizontal | 499.215.113123 | |||||
| HSK-F 63 | 467.663.000.000 | Compact | 499.212.113326 | |||||
| HSK-A/C/E 80 | 467.180.000.000 | Aluminum Horizontal | 499.215.113322 | |||||
| HSK-F 80 | 467.680.000.000 | Aluminum Horizontal | 499.215.113327 | |||||
| HSK-A/C 100 | 467.190.000.000 | Aluminum Horizontal | 499.215.113325 |
Indicators and Bases
TAC Rockford offers a variety of magnetic bases and indicators for use with runout test arbors and other gauges.
Available as kits with storage case or individually.
TAC Rockford precision ball arbors have a special adjustment mechanism which allows the ball runout to the taper to be adjusted.
Arbors are factory-adjusted to ≤0.005 mm (0.0002") runout. Runout adjustment fixtures are available for periodic verification and adjustment. A certificate of accuracy is included.
Gauge length is measured from the tool holder gauge line to the end of the ball. Please contact us for other ball diameters and gauge lengths. Inch dimensions are also available.
Arbors do not include a carrying case. Visit our carrying case options page for gauge crib upright storage, travel, and customized carrying case solutions.
For more information regarding this item (HSK Precision Ball-End Runout Test Arbors) or other items, fill out the form below
or contact our office directly:
Telephone: 815-962-5600
Fax: 815-962-4600
Location: 304 North Main St, Suite 104, Rockford, IL 61101-1101 USA
Email: infο@ΤΑCRοckfοrd.cοm
Related
HSK Standard Ball-End Runout Test Arbors
Ball end spindle runout test arbors are designed checking positioning accuracy of 5-axis machines, but can also be used in place of a standard runout test bars when a shorter length is required or for a touchoff point from the spindle face (ball end is ideal for this purpose).


